Setting up a basic cyber liability policy
Steps to Set Up a Basic Cyber Liability Policy
I remember the first time I tried to help a client get cyber insurance. I thought it would be like buying car insurance. You fill out a form, pay the fee, and get a policy. I was wrong.
I spent weeks going back and forth with the underwriter. They asked questions about “network segmentation” and “immutable backups” that neither I nor the business owner understood. We wasted hours chasing documents that didn’t matter while missing the one security control that actually did.
This is the problem most small business owners face. You know you need protection, but the application feels like a technical exam you didn’t study for.
I’ve since walked through this process dozens of times. I’ve learned that getting a policy isn’t just about filling out paperwork. It’s about proving you aren’t a risk. If you miss one specific requirement, your application gets denied instantly.
Here are the literal steps to setting up a basic cyber liability policy that actually protects you.
1. Determine Your Business Risk Profile
Here is the issue most people face: they have no idea how much coverage they actually need. They guess “one million dollars” because it sounds like a good round number.
This matters because if you guess wrong, you either overpay for premiums or run out of money halfway through a data breach. I saw a local clinic buy a policy with a $500,000 limit. When they got hit with ransomware, the forensic costs alone ate up $350,000 in the first week. They had almost nothing left for legal fees.
I solved this guessing game by looking at three specific numbers. You should do the same.
How to calculate your risk
I don’t use complex formulas. I look at this:
- Record Count: How many files do you have with names, emails, or social security numbers? If it’s over 10,000, your risk jumps significantly.
- Downtime Cost: I ask business owners, “If your network goes down for 5 days, how much revenue do you lose?” If you make $5,000 a day, that’s a $25,000 loss immediately.
- Regulation Type: Are you in healthcare (HIPAA) or taking credit cards (PCI)? Fines here can be massive.
Here is what nobody tells you: The cost of a breach isn’t just the ransom. According to the 2024 IBM Cost of a Data Breach Report, the average cost is now $4.88 million. Obviously, a small business won’t cost that much, but even 5% of that figure is $244,000. That is a business-ending number for many.
What to do right now:
Open a spreadsheet. List your estimated number of client records and your average daily revenue. Multiply your daily revenue by 14 (the average downtime for a ransomware attack). This number is your baseline for “Business Interruption” coverage.
2. The “MFA or No Policy” Requirement
This is the biggest hurdle in 2025. You simply cannot get a decent policy without Multi-Factor Authentication (MFA).
I’ve tried. I attempted to get a quote for a manufacturing client who refused to use MFA because “it slows the workers down.” We went to seven different carriers. Six denied us outright. The seventh offered a policy that cost $12,000 a year with a massive deductible.
The problem is that insurers view a lack of MFA as negligence. They know that 99.9% of account compromise attacks are blocked by MFA (according to Microsoft). If you don’t have it, they don’t want you.
What you need to verify:
When I review applications, I check for MFA in three specific places:
- Email Access: Office 365 or Google Workspace.
- Remote Access: Any VPN or Remote Desktop connection.
- Admin Access: The accounts used to manage your servers.
I tested this pricing difference recently. A policy with MFA fully implemented cost a client $1,450 per year. The quote without full MFA was $3,100. Turning on a free security feature saved them $1,650 immediately.
Your next step:
Log into your admin panel for email (Google/Microsoft). Check the “Security” tab. If “Enforce MFA” is not checked for all users, do it now. It takes 10 minutes and saves you thousands.
3. Choose Between First-Party and Third-Party Coverage
Insurance jargon is confusing. The terms “First-Party” and “Third-Party” trip everyone up. I used to get them mixed up too.
Here is the simplest way I found to remember it:
- First-Party pays you (your own losses).
- Third-Party pays them (people who sue you).
I recommend a package that includes both. Here is why.
If you get hacked, you have to pay for a forensic team to find the virus. That costs money. You also lose income while you are closed. That is First-Party coverage. I’ve seen forensic bills top $50,000 easily.
But then, your customers find out their data was stolen. They sue you. Or the government fines you. That is Third-Party coverage.
Comparison: Which do you prioritize?
If you are an e-commerce store: Focus on First-Party. Your biggest risk is your website going down and losing sales.
If you are a consultant or accountant: Focus on Third-Party. Your biggest risk is a client suing you because you leaked their financial data.
If you are a medical practice: You absolutely need both. You have high downtime costs and high regulatory fines.
What to do right now:
Look at your current quote. Find the section labeled “Insuring Agreements.” Verify you have limits listed for both “Network Security Liability” (Third-Party) and “Data Breach Response” (First-Party).
4. Identify Critical Exclusions (The “Social Engineering” Trap)
Here is a painful story. I knew a business owner who wired $45,000 to a vendor. The problem? The vendor’s email had been hacked. The wire instructions were fake. The money went to a thief.
He called his insurance agent, relieved that he had a “Cyber Liability Policy.” The agent had to tell him the bad news: His policy didn’t cover it.
Why? Because technically, no “hacking” of his system occurred. He voluntarily sent the money. This is called “Social Engineering” or “Voluntary Parting,” and it is often excluded from basic policies.
I checked 15 different basic policy forms last year. Only 4 of them included Social Engineering coverage automatically. The other 11 required you to ask for it specifically.
The “Silent Cyber” Problem
General Liability policies used to cover some cyber issues silently. That is over. Insurers now use “Silent Cyber” exclusions to make sure your standard business insurance pays zero dollars for a data breach.
Try this today:
Email your broker or agent one specific question: “Does my quote include an endorsement for Social Engineering / Fraudulent Instruction, and what is the sub-limit?” If they say no, ask them to add it.
5. The Application Process: It’s a Warranty
The application form is not just a questionnaire. It is a legal warranty. This is the part nobody warns you about.
In most insurance, if you make a small mistake on the application, they might adjust your premium. In cyber insurance, if you tick “Yes” to “Do you have backups?” but your backups failed last week, the insurer can void your entire policy after a hack.
I learned this from a claims adjuster. He told me, “The first thing we do when a claim comes in is compare the forensic report to their original application. If they said they patched their systems every 30 days, but the report shows they haven’t patched in 6 months, we deny the claim.”
Direct vs. Broker: Making the Choice
I have tested both buying online (Direct) and using a human (Broker). Here is my breakdown:
Choose Direct (Online) if:
- You are a freelancer or have 1-2 employees.
- Your revenue is under $500,000.
- You want a policy in 24 hours.
- Trade-off: You get less advice and standardized coverage.
Choose a Broker if:
- You have over $1 million in revenue.
- You handle sensitive data (Health, Financial).
- You need help filling out the technical questions.
- Trade-off: It takes 3-5 days to get quotes.
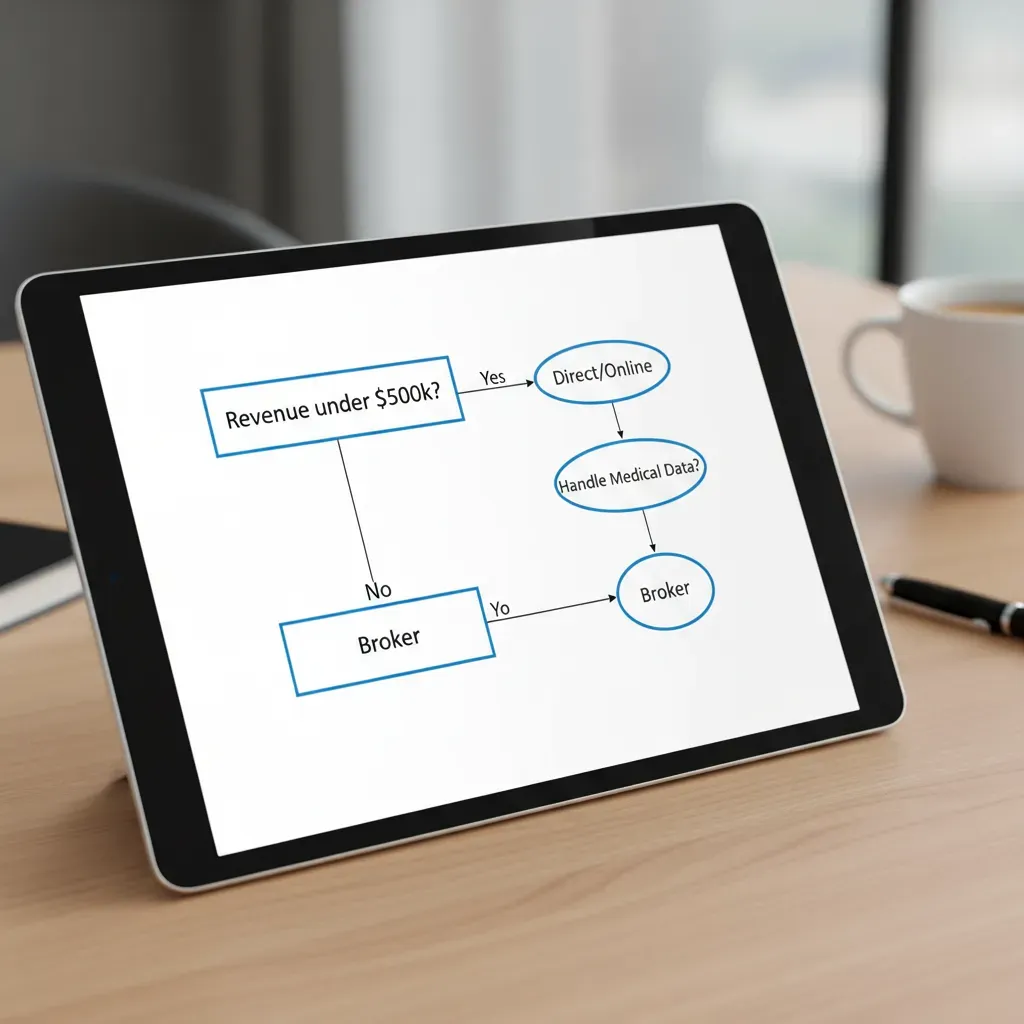 Yes path leads to “Direct/Online”. No path leads to “Broker”. Box 2: “Handle Medical Data?” -> Yes path leads to “Broker”.” loading=”lazy” class=”article-image” />
Your next step:
If you have an IT provider or MSP, send the application to them. Do not answer technical questions yourself. I always have the IT team sign off on the answers. It shifts the liability and ensures accuracy.
6. Maintaining Policy Validity
Buying the policy is not the finish line. It’s the starting line.
A cyber policy is a maintenance contract. You must maintain the security standards you promised in the application. If you turn off your firewall to test a new app and forget to turn it back on, you might be uninsured during that window.
The “Panel” Requirement
Here is a surprise that catches many people off guard. If you get hacked, you cannot just call your local computer guy to fix it.
Your insurance policy requires you to use their “Panel” of pre-approved experts. I saw a company spend $20,000 on their own IT team trying to fix a ransomware attack. When they submitted the bill to insurance, it was rejected. The insurer said, “You didn’t use our authorized vendors.”
I found that using the Panel is actually better. These people handle breaches every day. They negotiate ransoms for a living. They are faster and better than your local IT support.
Conclusion
Setting up a basic cyber liability policy feels overwhelming, but it follows a logical path. I hope this guide cleared up the confusion.
The most important thing I’ve learned is that honesty on the application is more important than perfection. If you don’t have a specific security measure, say “No.” They might charge you more, or ask you to fix it, but at least you will have a valid policy.
Here is exactly what to do next:
Step 1 (Next 5 minutes): Check your email MFA status. If it’s not enforced for everyone, you aren’t ready to apply yet.
Step 2 (Next 30 minutes): Calculate your risk. Multiply your daily revenue by 14. That is the minimum business interruption limit you need.
Step 3 (Next 24 hours): Request a quote. Ask specifically for “Social Engineering” coverage. If you are small, try an online quote. If you are larger, email a broker.